Putting Research Into Your Rehab – Patellar Tendinopathy
One of the most common injuries suffered by athletes and gym-goers is tendinopathy, more commonly known as tendinitis, however this term is technically incorrect as ‘itis’ means inflammation and this is not thought to play a big role in most tendon issues.
Tendinopathy is an overuse injury of the tendon that results in degeneration of the tendon’s collagen (main structural component of the tendon). It is believed to occur due to too much stress being placed on the tendon with inadequate time for it to recover/adapt positively to this stress. Often the pain from tendinopathy is worse in the hours after exercise or the next day rather than during exercise, where they tend to ‘warm up’/become less painful as exercise continues.
Common areas for tendinopathy include the patellar tendon (knee), Achilles tendon, hamstrings, biceps, wrist flexors/extensors (which attach proximally on the inside and outside of the elbow, respectively), and rotator cuff. In this article we will focus on patellar tendinopathy.
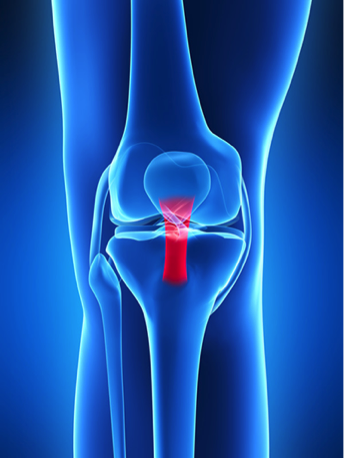
Patellar tendon runs from the bottom of the knee cap onto the top of the tibia (shin bone)
***Probably the most important thing to understand about these injuries is that COMPLETE REST DOES NOT HELP, AND NEITHER DOES JUST PUSHING THROUGH THE PAIN***
This is very different to most other injuries which tend to improve over time with rest. Tendons on the other hand MUST BE LOADED TO IMPROVE. The tricky part is getting the amount of loading right! Too much load and they often flare up and pain increases. Too little load and they don’t get better.
So in this blog I want to outline a guide to tendon loading that is both based off the research and one that I’ve found works well in my clinical experience.
*Note – this does NOT have to be followed like a bible; there are many different ways to load tendons, and some people will respond better to certain methods than others, and quicker/slower than others too – every person/case is different! This is just one protocol that I’ve found has worked well for myself and my patients.
It can be applied to tendinopathy in any area of the body. You just need to pick an exercise where the muscle/tendon in question is the main one being worked. In terms of the patellar tendon, the squat is a good example of a movement that stresses it well.
Here is the loading guide:
1. Start with isometric holds in the mid range position for whatever muscle/tendon is the issue (e.g. wall squat hold quarter to half way down for the patellar tendon). Hold for 30-45 seconds. Do 2 sets, twice a day (e.g. 2 in the morning and 2 in the evening). Use a level of resistance which allows you to do the hold with pain less than a 3/10.
Don’t push through the pain any more than that. This might mean doing the wall squat on two legs or one leg depending on how much load you can tolerate. Do this for a week and increase the resistance as able within those pain limits. Isometrics are great early on in tendon rehab as they have been shown to be very useful for pain relief (1).
2. Progress to eccentric contractions (lowering phase of any movement). Start at the top of the movement and lower over 5-6 seconds then help up/do the concentric (lifting phase) with the other arm/leg or on two legs. For the patellar tendon this would involve doing the lowering phase of a squat on one leg onto a bench, then standing back up with 2 legs.
Do this for 1-2 weeks and progress weight as able within the same pain limits (3/10). Eccentric rehab protocols have been shown to be very effective for rehabilitation of patellar tendinopathy (2).
Lower over 5-6 seconds, then stand back up with both legs
3. Progress back to normal isotonic squats on two legs (isotonic = lowering and lifting phases together) but using higher rep ranges (>15 reps). Slowly increase the weight/lower the reps over time as symptoms allow, keeping in mind to monitor how you pull up the day after making adjustments to the loads used.
Pull up really sore in the tendon? Probably best to regress a bit and build back up.
-Pull up with a bit of awareness/minimal pain? Try the same loading again and see if it feels better the next time.
-Pull up absolutely fine? Green light to progress!
-Pull up with a bit of awareness/minimal pain? Try the same loading again and see if it feels better the next time.
-Pull up absolutely fine? Green light to progress!
In terms of evidence behind this type of approach, a recent study showed that isotonics are beneficial for patellar tendon rehab (3).
4. The final stage of tendon rehab is returning to plyometrics, if this is a part of your regular training or is needed for your sport (which is the case for most field sports). By no means do you NEED to do this type of training for tendon healing if it’s not.
Before starting plyometrics it’s a smart idea to reach pain-free strength levels within 10% of what they were pre-injury, so that the tendon has re-established good load tolerance.
This is important as plyometrics are the most stressful type of activity for the tendon. It is important to gradually increase the volume of plyometric activities, and not jump straight back into a full plyometric program (4).
A good idea would be to start with double leg jumps and progress to single leg hops which will be more stressful on the tendon.
Single leg bounds – a type of plyometric exercise
5. For team/field sport athletes – once you can perform full plyometric training pain-free, a gradual return to full training should begin where the athlete progressively returns to usual volumes of running (both total distances and high speed distances), and eventually, a return to competition!
Throughout this rehab process, avoid or modify your gym exercises that cause more than a 3/10 pain. For example, for patellar tendinopathy try switching from normal back/front squats to box squats or low bar back squats, or from walking lunges/split squats to reverse lunges.
Following this process should help clear up most tendon issues. Tendons are often annoyingly slow to work with but normally respond well to sensible load progressions.
Finally, I would also recommend thinking about what may have contributed to the injury in the first place so that it’s less likely to come back (which unfortunately happens all too often with tendinopathys).
Most of the time it’s a tendon load management issue caused by either:
– too rapid a build-up in training volumes
– poor technique that places abnormally large stress on the tendon in question, e.g. squatting with excessive forward knee travel well past (>10-15cm) your toes for patellar tendinopathys; or jerky/bouncy movements at the bottom of the exercise when the tendon is being compressed
– not having enough variety in your training program (e.g. If you’ve high bar back squatted heavy for months on end maybe it’s time to change up the exercise or rep range)
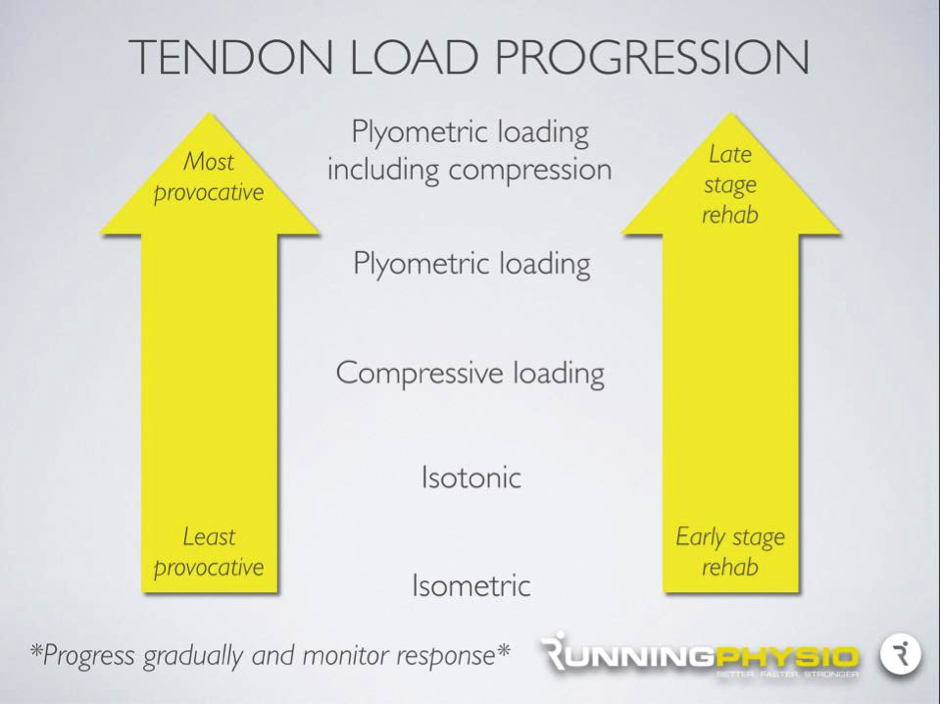
Here is a nice summary of what we have spoken about, in infographic form! Picture credit to the running physio.
References
- https://www.ncbi.nlm.nih.gov/pubmed/25979840
- https://www.ncbi.nlm.nih.gov/pmc/articles/PMC1725109/
- https://www.ncbi.nlm.nih.gov/pubmed/26707957
- https://www.ncbi.nlm.nih.gov/pubmed/26390269
YouTube video links:
https://www.youtube.com/watch?v=nAdDPdYictQ&feature=youtu.be
https://www.youtube.com/watch?v=21g2WPsN5DA&feature=youtu.be
https://www.youtube.com/watch?v=9_8R79bMnAU&feature=youtu.be
https://www.youtube.com/watch?v=Z24sGwZ0gEM&feature=youtu.be
Thanks, love this post on – Rehab – Patellar Tendinopathy, which is exactly the issue I am having at the moment. Is there any chance of getting the videos that go along with this please? Thank you
Hi Cristy,
Thanks so much for your comment.
We have updated the videos so you should be able to view them now! Please don’t hesitate to let us know if there still problems with the videos and we will find a way to get them to you.
I will continue to update the videos on the other blog posts too.