Breaking the Cycle of Recurring Injuries [Part 2]
Injuries are no fun. The pain is genuinely draining. But the same injury or pain coming back again and again after you thought you had dealt with it? That takes the cake…
In part 1 or this article we discussed the first 3 steps to break the cycle of recurrent injuries.
- Awareness and applying a principled approach
- Understanding the difference between Structural vs Functional Problems
- Prevention is always better than a cure
Now we are going to share with you the 3 key steps for creating lasting change so the pain goes away and stays away!
1. Assess your Movement – the true source of injury
You cannot progress what you do not assess. Without assessment, you really do not know your starting point. Sure, you can go by ‘how you feel’ but that will change day to day. Due to it’s variability, ‘how you feel’ is not a reliable or consistent way to measure progress. More importantly, without a thorough assessment it’s impossible to know if the injury you’re experiencing is because of a problem in the area where you feel pain or if it’s a result of compensation for another weakness. For example, knowing if your back pain as a result of a “back problem”or back pain due to over-compensation for tight hips. That’s why we always carry out a comprehensive movement assessment before making any assumptions about what is actually wrong.
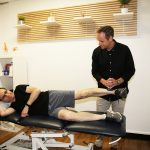
It’s also important to remember that a movement assessment is not a pain assessment or a structural assessment. It’s likely going to be a little different to what you have experienced in other rehab contexts. You’re not looking to determine which structure is the problem or which structure is painful.
We are seeking to evaluate and appraise the components of movement in order to determine the most limiting factors in your movement capability and use these as your starting point for developing a corrective plan.
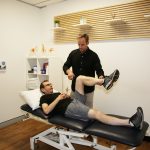
A Comprehensive Movement Assessment at MTP Health includes:
- Passive & Active Range of Motion
- Low Postural Demand Stability and Control
- Isolated Strength and Power
- High Postural Demand Stability and Control
- Compound Strength and Power
- Dynamic Control and Stability
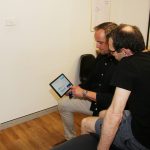
Obviously this approach is not something you can easily carry out on your own. So setting some basic movement parameters that you can self assess to see where your movement is limited and reference as you work through problems is super helpful.
To help you get started let’s run through a simple 5 steps movement self assessment that you can complete with no equipment. This will help give you a measurable baseline for identifying movement based limitations that you can re-test periodically to see if your “movement” is improving as your training progresses.
How it works:
Follow the instructions below for your set up and finish positions of these test. Be honest with yourself, you are better off identifying a possible weakness than pretending you are perfect… (no one is).
For each test movement give yourself a score out of 3. We have given you the criteria for each score above each test demonstration, but the concept is simple, if you can do the movement with ease through a full range of motion then you are a 3. If you can complete the movement but it feels forced or you feel you have to change position elsewhere in your body to complete it, then you are a 2. If you cannot get in the set up position or you cannot complete the movement, then you are a 1.
For the tests where you score both sides eg. Test 3-the active straight leg raise, your lowest score is your result. So if you scored a 1 on the right side and 3 on the left side you are a 1.
Once you have completed all 7 tests you will be able to identify the movements that are the most limiting for you, as they will have the lowest scores. This will allow you to focus your attention in your exercise programming on addressing the most limiting movements.
Note: If a movement is painful or feels unsafe for you to complete give yourself a zero and move to the next test. We strongly recommend if you have pain with any movements you consult a health care professional such as Accredited Exercise Physiologist or Physiotherapist to evaluate you properly.
Scoring Summary:
1 = Cannot complete movement: Needs focussed attention in your corrective plan.
2 = Can complete but requires compensation: Should address but 1’s take priority.
3 = Completes with ease: Not an area of concern. Use for normal training activities.
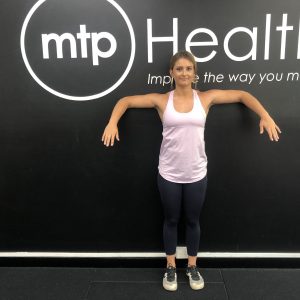
Self Assessment 1: The Wall Slide
- You cannot get into position with forearms contacting wall
- You cannot maintain contact with wall throughout
- You comfortably complete the movement with no compensation

Start Position: Heels, backside and arms all touching the wall
Finish Position: All contact is kept with wall as you press up and back down
Self Assessment 2: Standing Shoulder Internal Rotation
- Your forearms less than 45deg below horizontal
- Your forearms more than 45deg, shoulder blades on wall
- Your hands inside torso, shoulder blades on wall
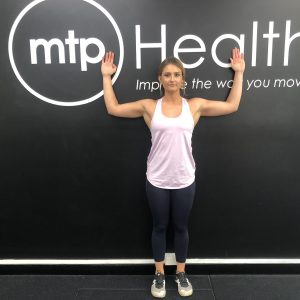
Start Position: Heels, Backside, Shoulders and Forearms all touching wall with arms bent at 90degrees.
Finish Position: Keep elbows and shoulders in contact with wall, wind your hands down as far as possible without letting your shoulders move forward off the wall.
Self Assessment 3: Active Straight Leg Raise
- Your raised leg ankle is below knee of the down leg
- Your raised leg ankle above knee but below mid thigh of the down leg
- Your raised leg ankle above mid thigh of the down leg
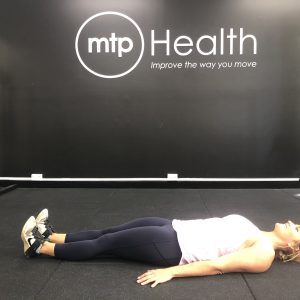
Start Position: Lying flat on back, feet together, toes pulled back toward you
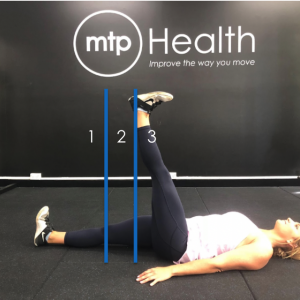
Finish Position: Stop when you feel any change of position require to raise higher. For example, knee bends, back flattens, down leg bends etc.
Self Assessment 4: Hip Bridge Stability
- Cannot maintain position with hands on floor
- Cannot maintain position without hands on floor
- Maintains position without hands on floor
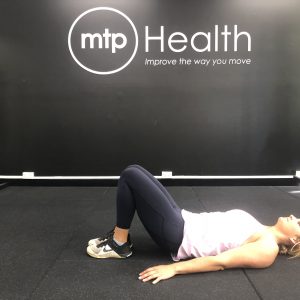
Start Position: Lying on back, feet together knees bent around 90degrees
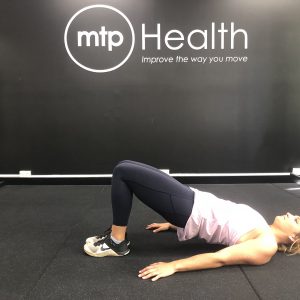
Middle Position: Lift hips up off floor so you can draw a straight line from your knees to your shoulders
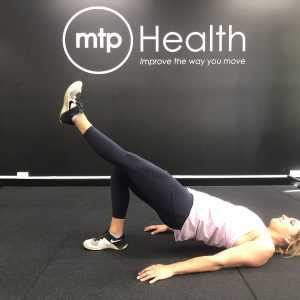
Finish Position: Holding the raised hip position, take one leg off floor and extend straight. Lower and repeat on the other side.
Self Assessment 5: Dead Start Push Up
- Cannot lift off floor
- Completes movement with compensation
- Completed with postural/shoulder control
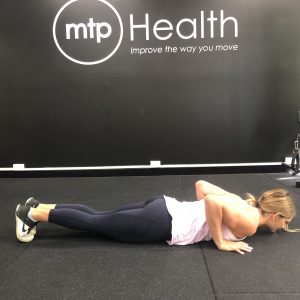
Start Position: Hands next to ribs, legs straight, toes pulled back, knees off floor.
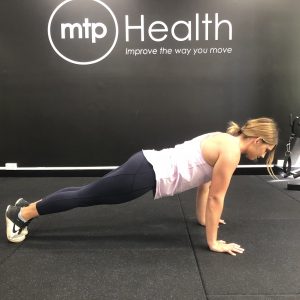
Finish Position: Press upward maintaining a straight body position. No arching or disconnect between shoulders and legs.
Self Assessment 6: Squat
- You cannot squat hips below parallel maintaining knee and foot position with heels elevated
- You can squat hips below parallel with heels elevated but cannot with heels flat
- You can completes full range of motion without compensation with heels flat on ground
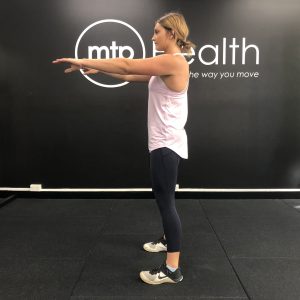
Start Position: Feet hip width apart and straight forward
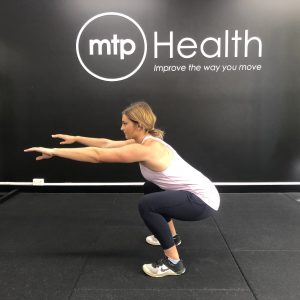
Finish Position: Heels on Floor, feet straight, hips at or below parallel, flat back.

Start Position: Heels on slightly elevated, feet straight arms outstretched.
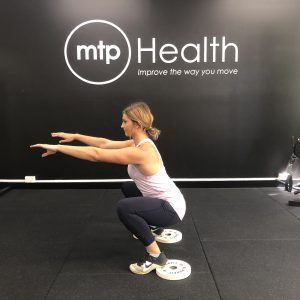
Finish Position: Heels on elevated, feet straight, hips at or below parallel, flat back.
Self Assessment 7: Single Leg Sit to Stand
- You cannot stand from seated
- You completes movement but lose position at knee, hip, or ankle
- You complete with ease and maintains knee, hip and ankle control throughout
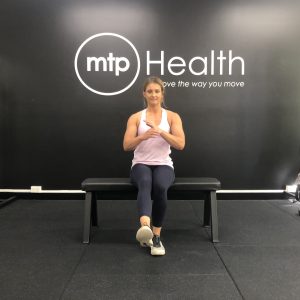
Start Position: Seated arms across chest, one foot off the floor
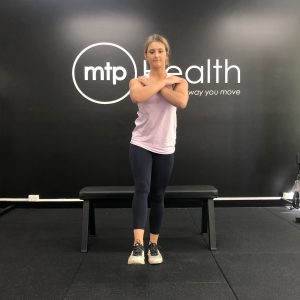
Middle Position: Stand all way up without losing balance and knee and foot stay pointing directly forward.
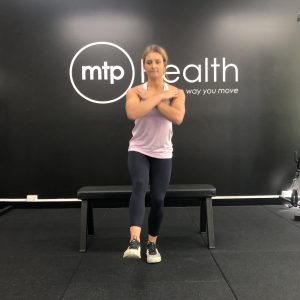
End Position: Low back to seated maintaining control all the way to seat. Foot and knee stay pointing forward.
Assessment 1: Standing Wall Slide
Score = 1
- Mobility focus upper back and shoulders. Stretching unloaded movements should be prioritised in your program design.
- Avoid two arm overhead pressing and pulling movements such as strict press or pull ups because you don’t have the shoulder range to do it without compensating
Score = 2
- You should still focus on mobility but a couple of stretches for your external rotation and/or upper back included into your warm ups will be adequate
- Focus on incline press or single arm movements if pressing overhead
Score = 3
- Exercise selection only dependant on training aptitude
- Your range of movement and is fine so this shouldn’t be an area of focus
- Use as a reference for making sure you maintain the movement you have
Assessment 2: Standing Shoulder Internal Rotation
Score = 1
- Mobility focus on shoulder rotation: lats, sub-scapularis, pecs, upper traps, posterior rotator cuff (infra-spin/teres maj. teres min.)
- Avoid dips, full push ups, bench press etc
Score = 2
- Mobility should still be included on the shoulders but a couple of simple stretches in your warm up
- Focus you strength movements on full range of motion, body weight and/or low load movements
- Avoid dips or heavy bench etc
Score = 3
- Exercise selection dependant on training aptitude
Assessment 3: Active Straight Leg Raise
Score = 1
- Mobility focus on hips: hamstrings, hip flexors, rectus femoris (quads), gastoc/soleus (calves)
- Avoid sprinting, high stepping, lunging, deep squats, single leg squats etc
Score = 2
- Mobility focus still required
- Work on full range of motion body weight and/or low load movements
- Avoid things like Single Leg Deadlifting, Heavy Deadlifting, Heavy Squatting
Note: Some movements will be fine with reduced range to maintain strength provided there is no pain and you understand that the movement correction is not the focus if limiting range
Score = 3
- Exercise selection dependant training aptitude
Assessment 4: Hip Bridge Stability
Score = 1
- Posterior chain stability/muscle activation focus: glutes, hamstrings, “core” stability not moving eg. plank movement or pallof presses
- Avoid big compound movements eg. Weighted squats, KB swings, Deadlifts etc
Score = 2
- Muscle activation work still required but can shift focus to movement control in larger compound lifts eg. Split Squats, Squats, Single Leg Deadlifts.
- Avoid high volume jumping, plyometric or speed work
Score = 3
- Exercise selection dependant training aptitude
Assessment 5: Dead Start Push Up
Score = 1
- Anterior chain stability and muscle activation focus: Shoulders, “core” stability not moving eg. planks, pallof presses
- Avoid push ups, bench, core stability done under high fatigue or high stability demand eg. TRX workouts
Score = 2
- You can tolerate increased demands on pressing stability and core: Eccentric push ups, tempo focussed work on horizontal push movements (dumbbells or cable presses)
- Avoid high volume pushing, dynamic loading eg. Fast burpees plyometric push ups, dumbbells preferred over barbells
Score = 3
- Exercise selection dependant training aptitude
Assessment 6: Squat
Score = 1
- Movement patterning and mobility required: Complete low load, range limited movements eg. Goblet squats to box
- Avoid Barbell work, high volume squatting, deep squats
Score = 2
- Heel elevated loading with movement/mobility focus to address limitations: Box squats, front squats, back squats all done with heel lift
- Avoid overhead squats, squatting with heels down and pushing range of motion
Score = 3
- Exercise selection dependant training aptitude
Assessment 7: Single Leg Sit to Stand
Client Scores 1
- Single leg stability focus: Range limited, balance work, wall sits, isolation strength eg. Leg ext, press, ham curls etc
- Avoid high box step ups, sprinting, jumping, high range of motion movements, unstable movements eg. Bosu balls etc
Client Scores 2
- Increased demands on single leg work: approx. 90deg range limited, tempo controlled eccentric work, weighted step ups
- Avoid plyometric work eg. Bounding, hopping, skaters etc.
Client Scores 3
- Exercise selection dependant training aptitude
As you can see from the overview above, there a many many ways you can address your movement quality and this just scratches the surface! But like we said earlier, the value in this process is using actual assessments to make decisions and to try and find underlying issues that can then be addressed through development of a tailored and progressive exercise program. Sometimes this means including specific exercises and sometimes it means leaving things out that are not helping you. Either way, the objective is to address underlying issues with how you move to prevent recurring injuries for the long term.
The bad news is, it will take time and commitment. However, by identifying and dealing with any weaknesses (including range, mobility and movement patterning) you are able to fundamentally improve the way you move for the rest of your life, creating lasting change which breaks the cycle of recurring injury and also prevents other potential future injuries which are bubbling up and not yet reached the pain stage.
2. Correct – to improve the way you move
So, now you have some actual measurements to work with you can take a more systematic approach to dealing with your movement limitations! This is where the magic actually happens. When you are able to start addressing problems that are not painful and are based on movement (not on structure) then you can really start to prevent future problems and break the cycle of re-injury.
Now, if you are committed to making change and want a comprehensive assessment and exercise program designed specifically to improve your movement and your health then you should book in to see one of our expert team for a movement evaluation consultation. This is the fastest and most comprehensive way to ensure you long term joint health.
If you just can’t possibly wait to get started and want to implement changes into your exercise program right now based on the outcomes of your self-assessment then let’s talk through how to use the assessment information.
3. Reassess – to ensure future injury prevention
The final step in the process is simple, REASSESS. Don’t just assess once and expect to make all the perfect changes in the first attempt. Your development is a process, your improvement is a process, and you will adapt and change and move differently as you progress. But you MUST REASSESS periodically to ensure you can move with the changes. We recommend every 4-8 weeks depending on the focus of your training. This way you can prevent developing new compensations or losing movement quality in areas of strength while you try to address areas of weakness.
The process we have outlined for you here is the same model we work by at MTP Health. Obviously the nuances and details are very different but our fundamental approach is the same. Our focus is to empower people to improve the way they move – for life. Which means not just getting you out of pain, but building up your ability to move well to the point that you are more resilient and in a better position than you were before the pain kicked in. This requires progression beyond the ‘pain is gone’ relief stage. In order to build up a foundation of improved resilience and movement quality, you need to make sure you assess if your program has addressed the first tier weaknesses identified and then consider if there are second tier weaknesses which also need to be cleared for a higher level of capacity reached to prevent injury recurrence. Without reassessment, you don’t know how well your program worked, and whether you are still vulnerable to re-injury.
Final Words: Injury No More
Once we have gone through this comprehensive process, we can be confident in saying that we’ve now broken the cycle of injury. We’ve been able to identify what the factors that actually went into causing the injury were, along with providing a progressive plan on how to fix them.
But as we mentioned before, our body is in a constant state of change. So we must keep challenging ourselves to effectively avoid any further issues. That’s where the idea of empowerment comes in. As you progress past your injury we will ensure a plan is put in place to help you become your own best therapist. We aim to give you the skills that will help you move well for life, so that you can live free from pain & injury.
This is why we designed our ascension model. This model uses progressive levels of programming to help you improve beyond the level required to function optimally in daily life. These programs have been expertly created to help you function at your best. To see more about these programs, click here.